이번 포스팅에서는 Collections Framework에 대해 이해하는 시간을 갖도록 하겠습니다.
본 포스팅은 생활코딩님의 Java Collections framework를 참고하였습니다.
(https://www.youtube.com/watch?v=KaPbVAxi5LE)
1.ArrayList
import java.util.ArrayList;

public class MainClass {
    public static void main(String[] args) {
        String[] objectArr = new String[2];
        objectArr[0] = "1";
        objectArr[1] = "2";
//        objectArr[2] = "3";

        ArrayList al = new ArrayList();
        al.add("1");
        al.add("2");
        al.add("3");

        for(Object a : al) {
            System.out.println(a);
        }
    }
}
기본적으로 Java 배열은 사전에 크기를 정의하고 인덱스 기반 접근을 허용합니다.
하지만 동적으로 데이터의 양을 조절하고 싶다면 ArrayList를 사용하시면 됩니다.
ArrayList al = new ArrayList();
al.add("1");
al.add("2");
al.add("3");

for (Object o : al) {
	System.out.println(o);
}
잠시 요 부분에 대해 설명드리면,
ArrayList에 add 메소드에 전달되는 매개변수는 모든 Object에 대해 가능합니다.
public boolean add(E e) {
	modCount++;
	add(e, elementData, size);
	return true;
}
실제 메소드의 원형을 보시면 제네릭으로 별도의 조건 없이 받기 때문에 모든 참조형 변수(Class)에 대해 허용한다는 이야기입니다.
( 제네릭을 이해하지 못하고 계시다면 https://chanho0912.tistory.com/36 를 읽고 이해해보시기 바랍니다. )
당연하게도 명시적으로 String이라는 class에 대해 ArrayList를 사용하시고 싶으시면
ArrayList<String> al = new ArrayList<String>();
al.add("1");
al.add("2");
al.add("3");

for (String o : al) {
	System.out.println(o);
}
제네릭 타입으로 String을 전달하면 해당 코드는 정상적으로 작동합니다.
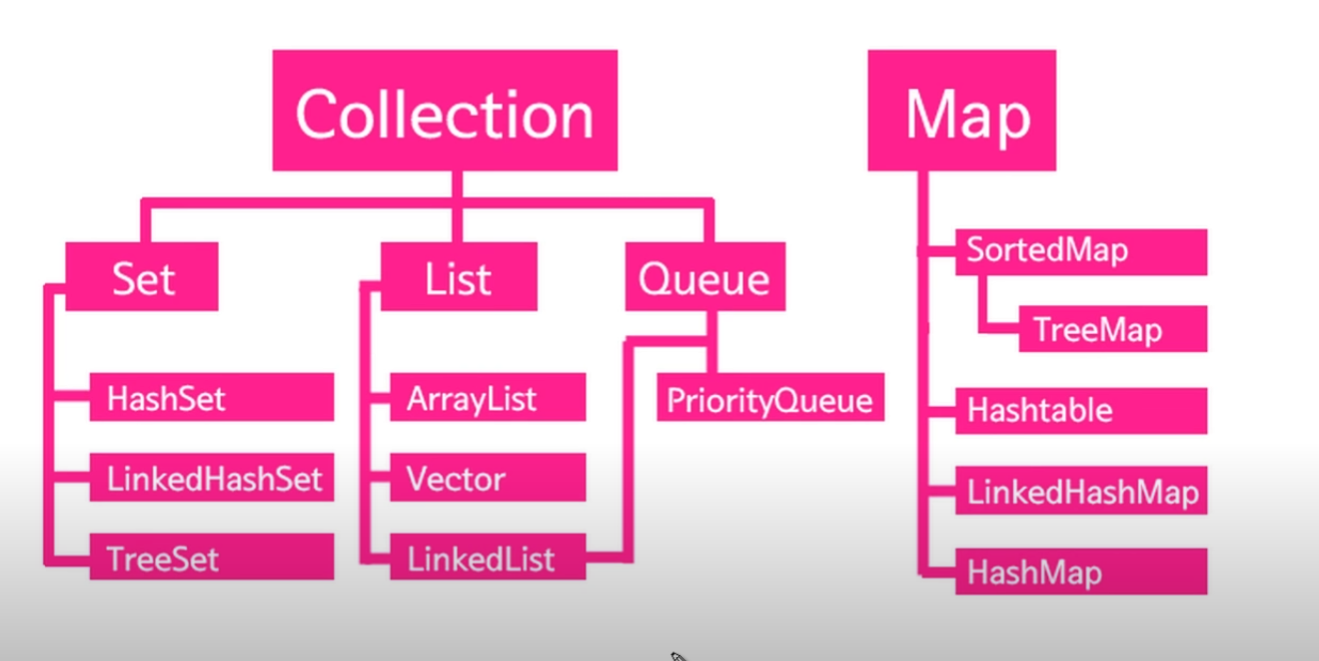
2. 전체적인 Collections Framework 구성
네 기본적으로 C++ stl과 굉장히 비슷하고 실제로 유사한 기능을 합니다.
(코테를 자바로 보려면 뭔가 이걸 알아야 할 것 같다...)
Collections Framework안에 Collection, Map이 있고 각각 이렇게 구성되어 있다 정도로 생각하시면 될 것 같습니다.
3. Set과 List의 차이점
1. ArrayList에서 List의 특징에 대해 간단하게 살펴보았는데,
결론적으로 말씀드리면 Set과 List의 가장 큰 차이는 Set은 중복을 허용하지 않습니다.
public class MainClass {
    public static void main(String[] args) {
        HashSet<Integer> A = new HashSet<Integer>();
        A.add(1);
        A.add(2);
        A.add(3);
        A.add(3); // 1, 2, 3

        Iterator hi = (Iterator) A.iterator();
        while(hi.hasNext()) {
            System.out.println(hi.next());
        }
    }
}
즉 위와 같이 1, 2, 3이 이미 존재하는데, 3을 한번 더 추가한다 하더라도 실제로 3이 추가되지 않습니다.
위 코드를 HashSet 대신에 ArrayList를 사용하면 1 2 3 3이 출력됩니다.
내부적으로 어떻게 중복을 피하는지 조금만 더 살펴보면
public boolean add(E e) {
    return map.put(e, PRESENT)==null;
}
기본적으로 HashSet에 add 메소드는 내부의 map에 푸시하게 되는데, map에 넣으려는 e가 이미 존재한다면 False를 반환하며 추가가 되지 않습니다.
* 참고로 Set은 Interface입니다.
public interface Set<E> extends Collection<E>
즉
이 그림을 다시한번 살펴보면,
Collection(interface)를 Set이라는 interface가 상속받고, Set을 각각 구현한 class가 HashSet, LinkedHashSet, TreeSet입니다. List와 Set은 다른 Interface이기 때문에 부모 메서드를 제외한 메서드를 공유하지 않습니다.
상속관계에 대해 한번 살펴보시기 바랍니다.
4. Iterator
public interface Collection<E> extends Iterable<E>
기본적으로 모든 Collection은 Iterator라는 interface를 가지고 있습니다.
따라서 모든 Collection은 Iterator를 활용할 수 있습니다. Iterator에는 hasnext(), next(), remove()라는 메소드를 가지고 있습니다. 따라서 Collection을 순차적으로 순회하면서, 원하는 원소만 삭제하고 싶을 때 매우 유용합니다.
public class MainClass {
    public static void main(String[] args) {
        HashSet<Integer> A = new HashSet<Integer>();
        for(int i = 0; i < 10; i++) {
            A.add(i);
        }


        Iterator<Integer> hi = A.iterator();
        while(hi.hasNext()) {
            if(hi.next().equals(3)) {
                hi.remove();
            }
        }
        for(Integer i : A) System.out.println(i);
    }
}
출력 : 1 2 4 5 6 7 8 9
또한 Collection Interface에 포함된 removeIf라는 메소드를 람다식과 함께 사용할 수도 있습니다.
A.removeIf(integer -> integer.equals(3));
5. Map
이번에는 Map에 대해 살펴보겠습니다.
Map은 기본적으로 Key, Value로 구성된 하나의 값을 갖습니다.
public class MainClass {
    public static void main(String[] args) {
        HashMap<Integer, String> A = new HashMap<Integer, String>();
        A.put(1, "one");
        A.put(2, "two");
        A.put(3, "three");

        System.out.println(A.get(1));
        System.out.println(A.get(2));
        System.out.println(A.get(3));
    }
}
출력 : "one" "two" "three"
기본적으로 put이라는 메소드로 원소를 추가합니다. 추가할 때는 각각 Key, Value를 사전에 정의한 타입으로 입력하게 됩니다. 그리고 원소를 찾을 때도 당연히 Key 값으로 찾게 됩니다.
그러면 Map은 어떠한 방식으로 순회하는 것이 좋을지 살펴볼게요.
우선 Map interface에 정의된 entrySet을 활용하여 Set으로 매핑시킬 수 있습니다.
public class MainClass {
    public static void main(String[] args) {
        HashMap<Integer, String> A = new HashMap<Integer, String>();
        A.put(1, "one");
        A.put(2, "two");
        A.put(3, "three");
        A.put(4, "four");
        A.put(5, "five");
        A.put(6, "six");

        HashSet<Map.Entry<Integer, String>> mapEntries = new HashSet<>(A.entrySet());
        for(Map.Entry<Integer, String>entry : mapEntries) {
            System.out.println("Key: "+entry.getKey()+", Val: "+entry.getValue());
        }
    }
}
출력 :
Key: 4, Val: four
Key: 6, Val: six
Key: 1, Val: one
Key: 5, Val: five
Key: 3, Val: three
Key: 2, Val: two
map의 entrySet()을 통하여 각각 Map의 변수들을 entrySet형식으로 바꾼 뒤, 그 값을 제네릭 인자로 전달하여 Set으로 바꾸어 줍니다. 이렇게 되면 Set 안에 entry가 존재하게 되고 위와 같은 방식으로 순회할 수 있습니다.
entrySet에는 getKey()와 getValue() 메서드가 존재합니다. 따라서 모든 정보의 Key, Value값을 순회할 수 있습니다.
그리고 Set으로 변경되었기 때문에 당연히 Iterator도 사용할 수 있습니다.
Iterator<Map.Entry<Integer, String>> Iter = A.entrySet().iterator();
while(Iter.hasNext()) {
	Map.Entry<Integer, String> entry = Iter.next();
    System.out.println(entry.getKey() + ", " + entry.getValue());
}

// 혹은

for (Map.Entry<Integer, String> entry : A.entrySet()) {
	System.out.println(entry.getKey() + ", " + entry.getValue());
}
6. Collections, sort
마지막으로 정렬하는 방법에 대해 소개해드리겠습니다.
import java.util.*;

class Computer implements Comparable {
    int serial;
    String owner;

    public Computer(int serial, String owner) {
        this.serial = serial;
        this.owner = owner;
    }
    @Override
    public int compareTo(Object o) {
        return this.serial-((Computer)o).serial;
    }
    @Override
    public String toString() {
        return serial+" "+owner;
    }

}
public class MainClass {
    public static void main(String[] args) {
        List<Computer> Computers = new ArrayList<>();
        Computers.add(new Computer(3, "chanho"));
        Computers.add(new Computer(1, "aaa"));
        Computers.add(new Computer(2, "ccc"));

        Collections.sort(Computers);
        for (Computer computer : Computers) {
            System.out.println(computer);
        }
    }
}
우선 Collections의 sort라는 메서드를 활용하면 List를 정렬할 수 있습니다.
public static <T extends Comparable<? super T>> void sort(List<T> list) {함수의 선언부를 보시면 sort에 제네릭 타입으로 Comparable을 상속받은 객체만 받을 수 있으므로 Computer에 Comparable을 implements 해줍니다.
그러고 compareTo라는 메서드를 override 하여 정렬의 기준을 설정할 수 있습니다. 위 예제에서는 serial 넘버를 기준으로 정렬을 원하기 때문에 위와 같이 정의해 주었습니다.
오늘은 여기까지 Collection Framework에 대해 살펴보았습니다.
*저의 글에 대한 피드백이나 지적은 언제나 환영합니다.
'Backend > Java' 카테고리의 다른 글
| JDBC 이해하고 사용해보기 (2) | 2024.07.23 |
|---|---|
| [Java] JaCoCo를 활용하여 code coverage 측정하기 (0) | 2021.10.19 |
| [Java] 제네릭 이해하기 (0) | 2021.07.17 |
| [Java] static 제어자 이해하기 (0) | 2021.07.04 |
| [Java] 프록시 패턴이란? (1) | 2021.06.22 |


